A job, long delayed by uncertainty about how to proceed, has finally been taken off my "to do" list: how to restore Voltage clamp boards which have failed. Time to devote to it happened because of Covid, - a minor bonus in these otherwise difficult times.
Early Powerspout turbines had V-clamp boards to keep voltage within limits when the output from the turbine is to an open circuit; the function of the board is to divert power to a dump load and thereby hold the Powerspout's output to a voltage acceptable to whatever device the turbine is connected to: - either an MPPT controlled battery charger, or as in my case, a grid tied inverter.
When manufactured, the boards were covered with a conformal coating intended to keep the underlying electronics free of moisture, but the coating used was hot melt glue and at low temperatures this becomes brittle, separates from the underlying printed circuit board and develops cracks. Through these cracks, moisture could reach the live circuitry beneath and sooner or later this had terminally disastrous results.
In the early months of my installation in 2013, two boards died in this way; but the years since have been completely trouble free through EcoInnovation having come up with a one-off special, - special in that the board was entirely encased in an epoxy resin block.
So the long delayed job has been to repair the two boards that died, and then to cast them in epoxy, as had been done for the special.
Here, in pictures and captions, is the process:
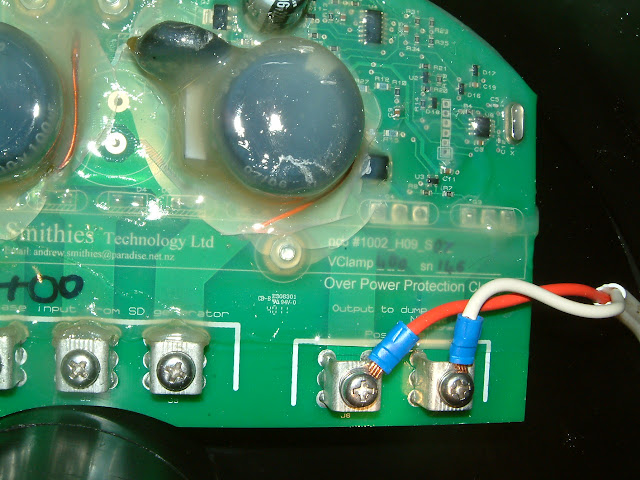 |
| An original board showing how the coating of hot melt glue cracks and separates from the underlying pcb, allowing moisture to enter. |
 |
| Typical tell-tale evidence of underlying pcb damage with blackening visible through the conformal coating and molten glue running out. The white stuff is heat conducting paste applied to the heatsinks on the board where they attached to the bulk head of the turbine; the bulk head, being water cooled on the pelton side, creates a good means of dissipating heat from the power electronics on the board. |
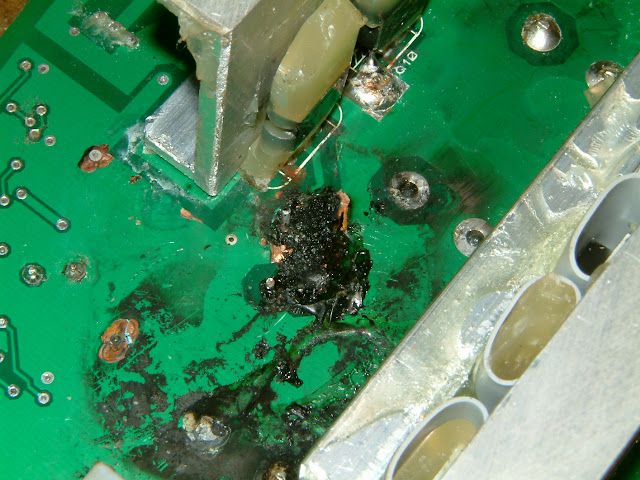 |
| Initial view of the damage once glue had been removed; since hot melt glue becomes brittle at low temperature, cooling the pcb in the freezer to -18 deg C allowed the coating to be chipped off, but it is a very time consuming process and care is needed not to accidentally remove any surface mounted electronic components. (addendum 9 Feb 2021: see below for an alternative method.) |
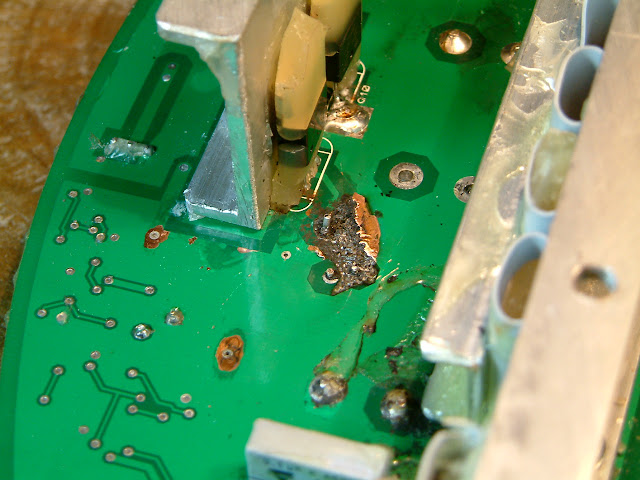 |
| Later view of damaged area after further cleaning, showing the glass fibre substrate of the pcb has carbonised and copper tracks have been lost; carbon being a conductor, this all had to be removed using a precision rotary tool (Dremel) and the resulting cavity filled with non-conducting epoxy. |
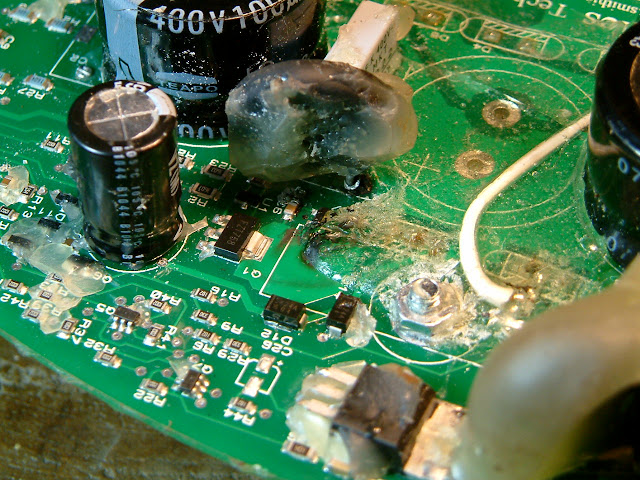 |
| Top-side view of the same area of damage; from some components such as the surge protection thermistor in the centre, the hot melt glue could not be removed, so this device was de-soldered and replaced with new; flakes of hot melt glue are still visible around surface mounted components. |
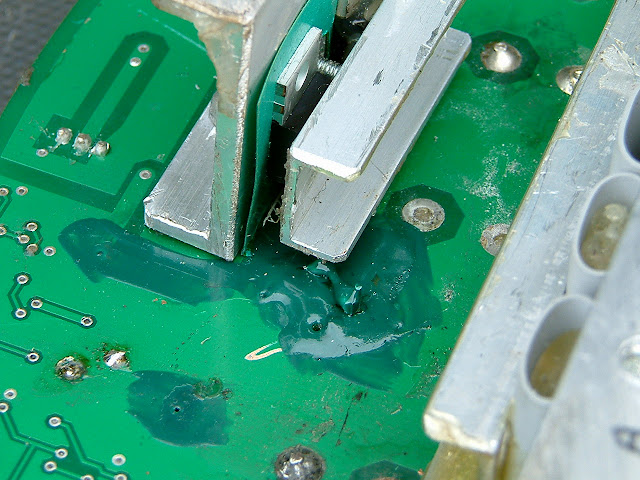 |
| Damaged area after repair; the next stage is a final clean with isopropyl alcohol then casting in epoxy |
 |
| Topside view after repair with a new surge protection thermistor and adjacent capacitor |
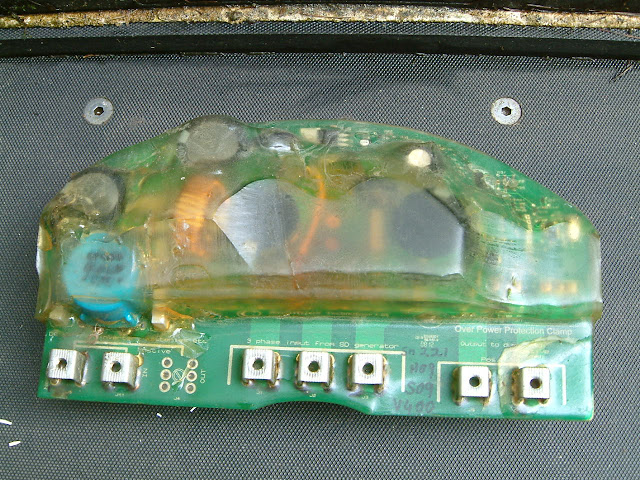 |
| This is the 'special' made for me by Andrew Smithies, who designed the board; it was with his advice I arrived at my method of casting; one key piece of advice concerned 'thermal runaway'; this is the intense heat generated by two part epoxy compounds as they cure; the heat was so much when he did it that it melted the mould and let some of the epoxy escape; the resulting void had to be filled later with more epoxy; but epoxy added later to already hard-cured epoxy does not unify into one block, so I was keen to avoid this happening. |
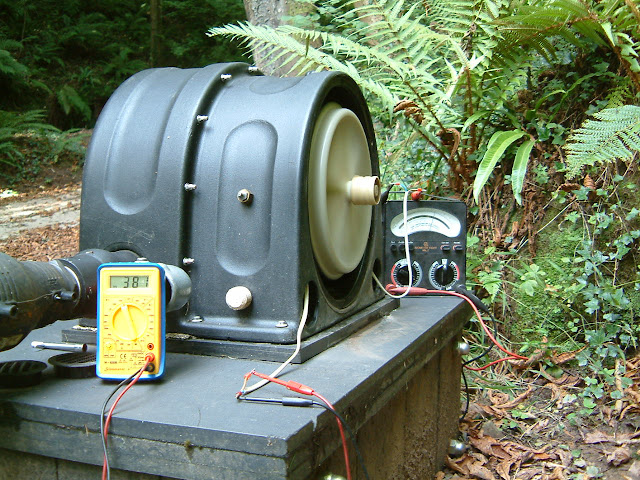 |
| Before proceeding to casting the repaired pcb I wanted to check it was fully functional; at this stage it was vulnerable to moisture with the bare soldered components having no protection, so testing had to be done on a dry day with low ambient humidity; the test shows volt meters on the two outputs when the turbine was operating without power being fed to the inverter: - the digital voltmeter reads 381v dc, which is the correct voltage for the 400v version of the V-Clamp board, and the AVO analogue meter is reading the voltage being fed to the dump load. The turbine was then allowed to connect to the grid via its inverter and a test was performed to simulate a 'loss of grid' event to check the circuit board instantaneously diverted power to the dump load; all tests were satisfactory and I felt confident the board could be epoxied. |
 |
The secret to constructing a mould which can be used more than once is to use material for the mould to which epoxy does NOT bond, and that means polypropylene; a convenient source is a kitchen cutting board and such is what I used, price £7; for the curved bottom, on my first effort, I used a strip of flat rubber sprayed with silicon lubricant to act as a releasing agent; but the epoxy bonded to it and when the mould was disassembled, the rubber had to be carved off the cured epoxy block; on my second effort I used a non-stick sheet, PTFE coated, marketed as oven shelf liner; it worked fine but needed to be supported by a backing for which lead sheet, as used in roofing, proved OK. Where pp or PTFE is used, no release agent is necessary, - the cured epoxy separates from the mould very easily.
|
 |
| The epoxy I chose to use was "Water clear" Transparent Epoxy Potting Compound from MG Chemicals; I bought it through RadioSpares; for the size of mould I had made each board needed 1.125 litres of epoxy; conveniently for two boards this meant buying one kit of 1.5 litres (RS no: 181-0370) and two kits, each of 375 mls (RS no: 181-0369); each kit comprises resin and hardener in a ratio of 2:1. It is not wise to attempt a mix of 1.125 litres to fill the mould in one go because this will lead to unmanageable thermal runaway; it could get hot enough to damage components on the board; I mixed 300 mls at a time (200 resin + 100 hardener) at half hourly intervals to stagger the curing time and reduce the temperature rise; it therefore took about 2 hrs to fill the mould; even doing it this way, the temperature still reached about 80 deg C and the 300 ml mixes added last cured more quickly than the earlier mixes because the mould had by then begun to get hot. |
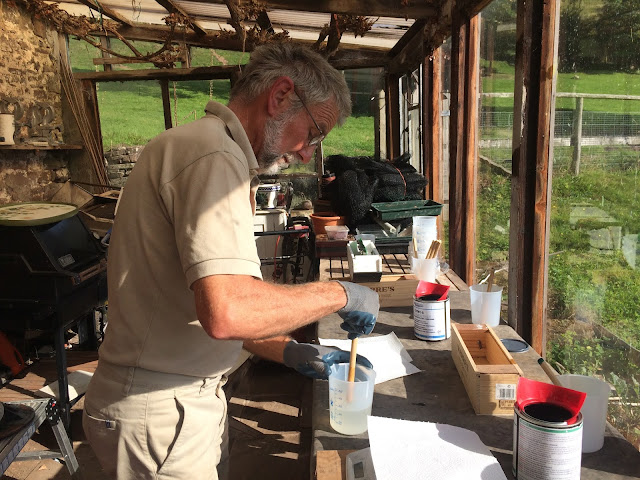 |
| You are helped to a good outcome in epoxy potting by being well prepared: graduated beakers for mixing resin and hardener, stirring sticks, cleanliness in the work area, a means of de-aerating the mix before pouring it into the mould, a kitchen timer or clock, warming the resin and hardener in the oven to 45 deg C before you start so their viscosity is as low as possible to facilitate mixing and de-aeration. Thorough mixing is particularly important because any resin not mixed with hardener will not cure; it will lead to a sticky patch in the finished block; I stirred for 5 mins timed on a timer; the type of epoxy I was using will remain workable for up to 1 hour at 20 deg C but for less time if it is warmer; each successive mix of 300 mls will bond to the previously poured batch as long as the cure has not reached the stage of being hard, as estimated by whether a finger nail can indent the surface. |
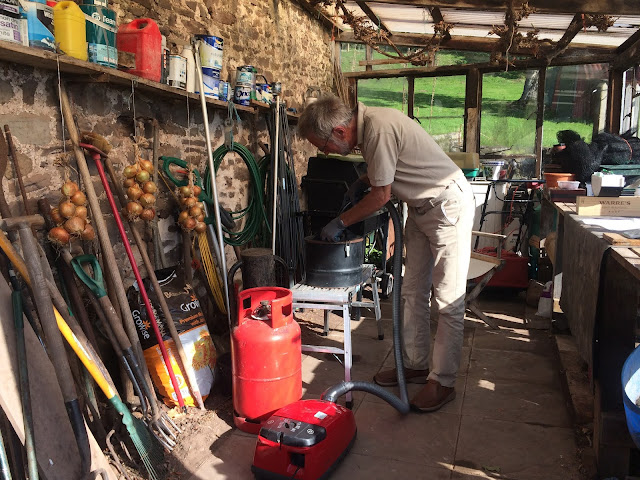 |
| Getting the bubbles out after mixing the resin and hardener is important; it can be done by waiting if the mix is not too stiff, or it can be done by placing the mix in a chamber and reducing the pressure; I chose the latter method and used a vacuum cleaner to suck out from a closed container; it seemed to work and I supposed it worked by making the air bubbles in the mix expand and so rise to the surface more quickly. |
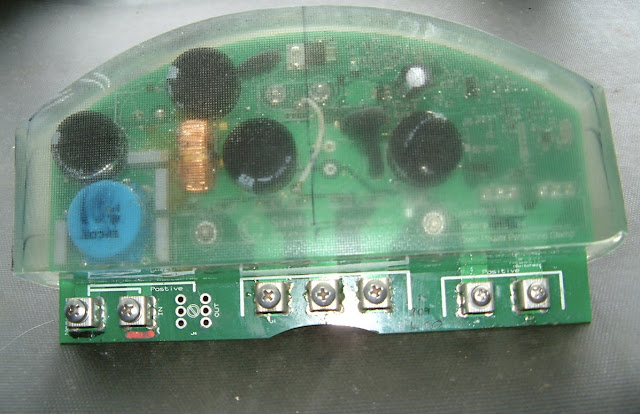 |
| There are two stages to the curing process, soft cure and hard cure; you don't want to remove the block from its mould until hard cure has reliably been achieved throughout its mass; this can be ensured by 'post-curing' in an oven at 80 deg C for 4 hours, and this is what I did, waiting until the next day when it had cooled down to disassemble the mould. |
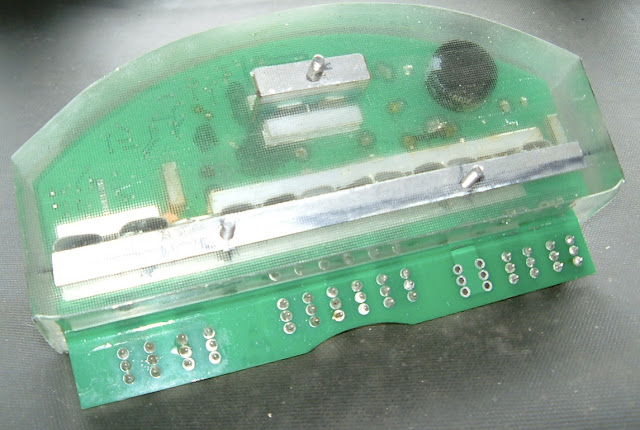 |
| The result was better than I had expected: the epoxy had filled all crevices and the mould left clean edges; the original V-Clamp board attached to the Powerspout bulkhead with self tapping screws driven in through the bulkhead from the pelton side but a modification in this epoxied board was to incorporate M5 machine screws into the epoxy, onto which Nyloc nuts fasten to draw the heatsinks tight against the bulkhead. I had expected to have to reduce the bulk of the finished block with a disc sander in order to get it to fit in the confined space it occupies above the Powerspout's bearing housing, but in the event it fitted perfectly by entering it from the bottom right side and then rotating it anticlockwise into its final position. |
Conclusion:The board depicted was installed in the turbine on 7th October 2020 and has so far worked perfectly; it should, I hope, go on working for years to come.Repairing and epoxying these two boards has not been without expense: the more severely damaged one was beyond my repair abilities and cost £320 to have done professionally. The other board only cost the price of replacing one MOSFET, - a few pence.
Clear epoxy of the type I used is not the cheapest available but I wanted to be able to inspect the encapsulated components should failure occur, - not that repair would be possible once potted.
For each board the epoxy cost worked out at £232.
I did have the option of ditching the present system in which a V-Clamp board is necessary, either by changing to using a Klampit device and continuing with the SMA inverter I use, or by discarding the SMA inverter and changing to one which can accept 600v dc rather than the 400v dc the SMA is designed for.
Either alternative would have meant disrupting a system which has proved bomb-proof for 7 years, and having several spare SMA inverters and V-Clamp boards, I decided to stick with that way of dealing with voltage capping.
Getting to the point of having these two boards repaired and ready for use has been a long journey; for several years I didn't think it was going to be possible; but having done them, and having learned a good deal in the process, I'm glad of having pursued it.
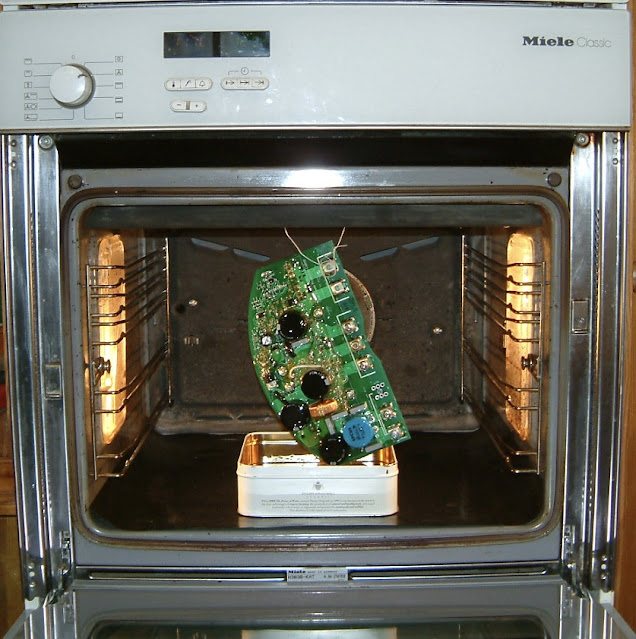 |
| An alternative method to cooling to remove hot melt glue is to use heat; at 120 deg C the glue becomes liquid and drips off; the circuit board is hung in an oven; |


